Upload Ino to Arduino Without Arduino Ui
As an electronics engineer getting back to my roots with Arduino, I plant it could be a little confusing getting started uploading code (or sketches) to an Arduino. Installing drivers, IDEs, and everything else involved wasn't a straightforward chore. So I put this guide together based on my experience uploading code to a new Arduino on a new computer.
This guide is a footstep-by-step (with pictures) on how to upload and run lawmaking on an Arduino using a Windows 10 motorcar. The Arduino I've used is the UNO WiFi Rev ii, though the steps (and problems I solved) should exist similar for most Arduino models. See common issues at the bottom of this guide if you're having any issues post-obit the steps. I've also tended to employ sketch and code interchangeably in this guide, a symptom of being an electronics and software engineer by training.
Step ane: Connect Arduino using a USB Cable
Typically a USB Type-B cable is used to connect to an Arduino – it has the USB 2.0 Type-B connector on one terminate and the USB 2.0 Type-A connector (for a reckoner on the other).
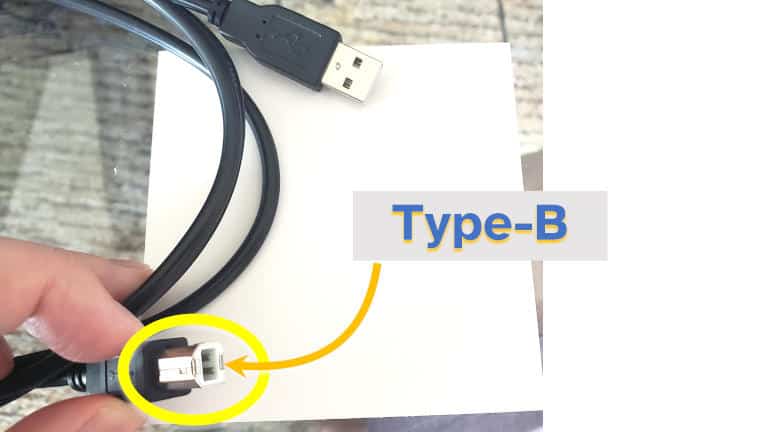
At the shop, I asked for a "USB printer cable" every bit this is besides the sort of cable that is used to connect a computer to a printer. It cost me a few dollars. Whatever standard length seems to be OK, though I imagine it must be shorter than v metres (16 feet); I ended upwardly ownership a 1m cable.
It didn't affair which USB socket I used on my computer, they all seemed to piece of work fine when communicating with the Arduino, even the USB Type-C hub that I utilize with my laptop allowed me to programme the Arduino.
A carve up power cablevision is not required; the USB connection to the computer will power the board.
Need more than help with which USB cable to apply, or which wires and cables an Arduino requires? I wrote a whole guide on USB cables and wires useful for Arduino, check it out here: chipwired.com/arduino-cables-and-wires
Footstep 2: Open up the Arduino IDE
The IDE (Integrated Development Environment) is used to write code, compile programs, and upload them to the Arduino for it to execute.
The IDE tin can exist downloaded from Arduino'south website here. I used the portable 1, so all I had to do was extract it to a binder and run the executable. If installing information technology, follow the steps in the installation wizard to get started – I believe the installation magician has the advantage of taking intendance of installing the drivers for you. It's the IDE that lets you lot write code into sketches, compile those sketches into instructions for the processor, and upload those instructions to the Arduino.
If using the portable IDE, you might need to install drivers (this is what I had to do, see "Issues I encountered" beneath). The easiest fashion I found to install drivers was to run the executable in the drivers folder where I extracted the executable to.
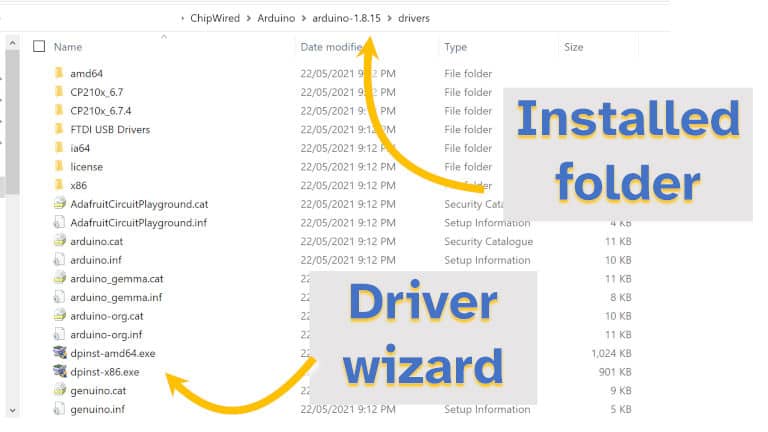
At first my board wasn't listed, I had to click some text in the bottom left of the IDE to update information technology so that my lath was shown. I was having a problem with uploading sketches until I clicked this update. Doing this update ran through the driver install wizard as well (installing an additional driver), but I imagine it's a good thought to run through the wizard separately anyway (as I did above).
Footstep 3: Select the Arduino Board and Port
Under the Tools menu at the peak of the IDE, select your Board and your Port.
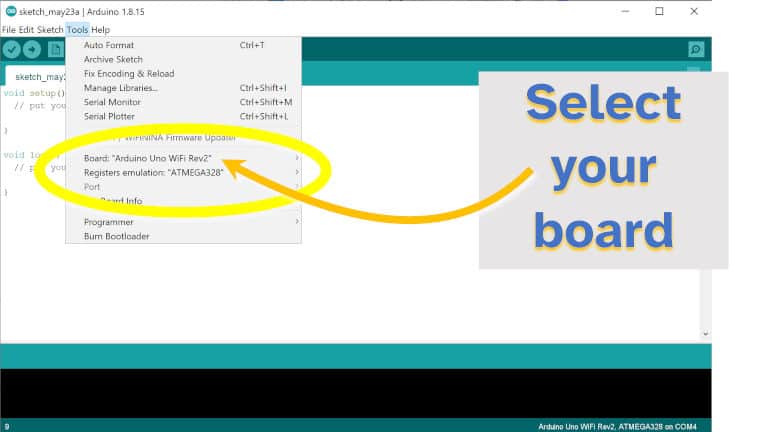
For Board, I found that mine didn't prove up at first, and the IDE had selected a similar model. This caused me problems subsequently, and then make sure your board is selected. If your board isn't listed, check out the previous steps about installing drivers.
For Port, I found that the IDE automatically selected the right port every bit there was only 1 listed. Some of the research I did said that if there was more than one port, try each of them that's not COM1 (evidently Windows never allocates this to an Arduino).
If Port is greyed out information technology means that the IDE does non believe the Arduino is connected to the computer. Connect the Arduino and Port will become an pick that tin can be selected. If the Arduino is connected, it means the IDE cannot identify information technology, take a wait at installing the drivers as per Pace 2.
Step iv: Prepare a Sketch (or write some code)
Starting with an example is the easiest fashion I've found of testing out a new Arduino and calculator setup, or getting started on your ain project.
To use an example sketch, click File then Examples then Basics and I like to start with the glimmer example. This will load a new sketch that contains lawmaking to glimmer the LED on your board. These examples are already configured for your lath so it should blink the correct LED without any need to alter the lawmaking.
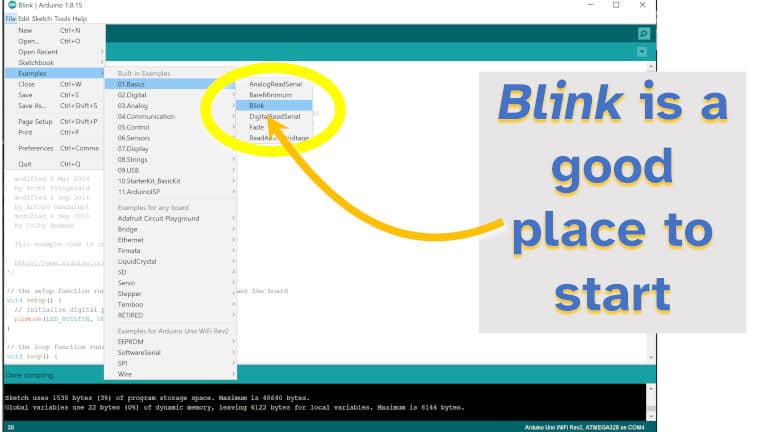
Even when starting my own project, I like to use one of these examples as a starting betoken. Information technology'due south code and a setup that you know works, which is a proficient place to showtime. I then add to the code to reach whatever I'g trying to exercise.
Arduino lawmaking, contained in a sketch, is separated into two sections: A setup, that'southward run once when the board powers up (or programming has finished); and a loop that runs in a loop equally long as there is power to the board. There are other ways that code tin exist executed (I'm thinking interrupts here), but that's another article's worth of detail.
Step 5: Upload Sketch (look for the Tx and Rx LEDs flashing)
To get the code running on the Arduino, click Sketch then Upload. The upload stride will also do the verify/compile step, and then there'due south no need to click it separately for the purposes of this guide.
The RX and TX LEDs should flicker a little as the IDE sends the code to the board.

I found that as soon as uploading the code was complete, the Arduino started to execute it. This took me a while to realise as the default sketch loaded on my Arduino (UNO WiFi Rev 2) was the Blink one where the LED blinked every 2nd. To test this, I modified the code to flash unevenly (attempt changing the delay(xx) numbers) so that it was obvious my code was running on the board.
If your code is non running on the board, check out the section below where I go through some of the problems I encountered.
Finishing Up
After following these steps, y'all should at present have:
- An Arduino connected to your computer
- An IDE that uploads code/sketches from your computer to your Arduino
- An Arduino that executes the code that was uploaded to it

If you lot're Arduino is not running the uploaded code, there could be a few things that went wrong. I've included beneath how I solved some of the problems I faced when uploading my first sketch to an Arduino.
Common Problems when Uploading Arduino Code
If you need help with writing the code for a sketch, I wrote a whole guide on the basics of an Arduino sketch and how to employ variables, equations, loops, functions, and more. Bank check it out hither: chipwired.com/arduino-programming-language-guide
These are the bug I found when I was trying to write my start program to an Arduino:
My Board Wasn't Listed in the IDE
Nether the Tools menu y'all can run into which board the IDE is intending to upload your program to. When I opened the IDE for the first time, it automatically selected a board that was similar to mine merely not exactly the same. I encountered issues uploading the sketch to the board because I had the wrong one selected; my board wasn't even an pick!
To fix the problem where the target Arduino is not listed in the Tools menu:
- Install the latest drivers from Arduino, these can exist establish in the drivers binder where the arduino.exe file is stored
- Install any updates for the IDE, expect in the bottom left-hand corner when the IDE is first opened – information technology will alert you lot hither if at that place are any necessary updates
Wrong COM Port or COM Port Greyed Out
Ordinarily this is due to the wrong drivers being installed for the board you're using.
If you've installed all the drivers and your lath is selected in the IDE (see higher up) but the COM Port still isn't correct, I've heard that updating the drivers in the Windows Device Managing director is the style to ready this
Programmer is not responding
When I first tried to upload a sketch to my Arduino an fault popped upwards saying something like avrguy: programmer is not responding.
From my feel in microcontroller electronics (I'thousand relatively new to Arduino), the Arduino that runs your lawmaking can exist a separate lath to the device that records the program to the Arduino (the 'programmer'). On my offset Arduino (an UNO WiFi Rev 2), the programmer and the microprocessor are office of the same board. Other Arduinos might have different configurations – e.g. having a separate programmer can salvage infinite as it doesn't always need to be fastened.
To fix this trouble:
- Ensure the right lath is selected in the Tools carte du jour of the IDE
- If at that place is an option to select the Programmer (in the Tools carte), then make certain the correct programmer is selected
- Ensure the right drivers for your Arduino (and programmer if separate) are installed on your reckoner – encounter the steps above on how to do this
Later on many years away from electronics projects, Chris recently dived back in past picking up an Arduino. This guide was written based on his beginning experiences setting up a computer to program an Arduino.
Source: https://chipwired.com/uploading-code-arduino/
0 Response to "Upload Ino to Arduino Without Arduino Ui"
Publicar un comentario